REST API with Java and Spring Boot
Setting up the environment
In this series of articles, we are going to create a step-by-step guide, with some detail, on how to develop a REST API using Java and Spring Boot. In this first part, we will introduce a theoretical content about REST and show which tools will be used in this project.
Tools used in a RESTful Web Service
There are several ways and a wide range of tools with which we can build a REST API. In our case, with the Java programming language, we will use the very popular set Spring + Hibernate and the IntelliJ IDEA.
Firstly, it is worth to briefly explain what a “REST API” stands for and why this type of architecture is so useful.
REST
“REST” is an acronym for Representational State Transfer. These words alone don’t mean anything, but the explanation is quite simple. REST is a set of software architecture principles that facilitates the transmission, between client and server, of the representation of the current state of a given resource within an application. This representation takes place through several data exchange formats between systems, and JSON is the most used of them.
With REST, the same definitions as the HTTP protocol are used (such as the GET and POST verbs), so we are talking about a stateless type of communication. This type of communication establishes independent request-response connections. This means that the server does not retain information (the state) from previous requests, thus it does not work with sessions. Therefore, REST can provide us with great ease both in building and executing APIs.
Spring
Along with REST, the Spring Framework also has a lot to contribute to us when we are seeking practicality and agility in building, running, and maintaining applications.
Unlike the rather intricate model we used to see in Java EE, Spring made the code much simpler and friendlier. This framework is based on two important concepts for the software development world: Inversion of Control (IoC) and Dependency Injection (DI).
Inversion of Control, in a nutshell, means transferring responsibility from one entity to another. In our case, the framework takes the control (that we had before) to build objects. That’s why we say the control is inverted. One way to perform Inversion of Control is doing Dependency Injection.
In an application, Dependency Injection allows states to be determined by the passing of parameters (through constructors or setters, for example). Dependency Injection, thus, assists the process of creating and providing instances that a particular class needs. The class’s dependencies, therefore, are provided by someone outside this very class.
This means that the business rule written by the programmer does not have to deal directly with all the project’s dependencies and infrastructure. These are attained automatically. It makes the code more decoupled and therefore easier to maintain.
In addition, Spring has several modules for different types of applications and also allows integration with Java EE tools, such as JPA and Bean Validation.
Anyone who has developed an API before Spring, using servlets, having to configure everything manually, dealing with XML files, etc., knows the huge difference that the framework makes when developing a project. It provided an enormous leap in productivity and agility. Thus, the importance of Spring in nowadays web development scenario in the whole world is evident.
But the advances do not stop there. The Spring project was able to take another step forward when they released Spring Boot, which provided even more productivity and agility for developers.
Spring Boot
In a daily routine of a company, agility and productivity are key. And Spring Boot was very pertinent in contributing to simpler and more efficient production. With it, it was possible to make better use of the time, including code maintenance. Its simplicity and fewer configurations requirements reduced a lot the chance of writing something wrong, subjected to bugs, compared to what was seen before.
With Spring Boot, the use of a servlet container in the application is not necessary anymore. So, it is no longer needed to install a web server, such as Tomcat, as it is already built into the framework. This also means that we also do not need to create a WAR file, for the application build is generated in the JAR format, which is much simpler and lighter. To run the web application, we just need to use a special class (which contains a main method) created by Spring Boot itself.
As previously stated, the advantage of Spring Boot over previous technologies is greater productivity, efficiency, and agility, as much less time is spent configuring different parts of the application, given that the structure of the project to be created is already predefined.
Spring Initializr
Since saving time is one of the most important things in the business world, the more automated the processes, the better. This is where we come across Spring Initializr, a Spring Boot project generator.
Once again, we have technology that makes creating an application much easier and less consuming. We no longer need to manually create the project within the IDE (“Create new Maven project…” or “Create new Dynamic Web Project”) and configure pom.xml, parent, dependencies, etc. With Spring Initializr, we just go to the website, select our preferences, name the project and choose the dependencies. Spring Initializr itself will prepare a ZIP file, which will be downloaded and then, after the unzipping, it will be ready to be imported into the IDE as a Maven or Gradle project.

As shown in the image above, in our project we will use Maven and Java 11. The name of the project will be “rest” and the main package will be “com.example.rest”.
In addition, we can see that in this API we will use Spring Web, Spring Data JPA, Spring Boot DevTools, MySQL Driver and Validation dependencies. Other dependencies commonly used in projects like this, such as Security or Cache, will not be necessary for now.
As we build the API, the explanation of each of these dependencies will be provided.
Spring Boot DevTools
The purpose of the Spring Boot DevTools dependency, which was added at the creation of the project, is to restart the application automatically whenever we change something in the code and save it. With this, we gain efficiency, as we don’t need to manually stop and start the server after each change we made.
Database
To have access to a database, we will use the JPA specification (Java Persistence API) through Spring Data JPA, which we added as a dependency when creating the project. By default, Spring Boot uses Hibernate as the implementation of JPA, which is the most common ORM on the market.
We also need a dependency for a database. At project creation, we added the MySQL Driver. For everything to work correctly, you must obviously have MySQL installed in your machine, and have a username and password to connect.
If you already have imported the project into your workspace, the next step now is to configure the access to the database. In the application.properties file (in src/main/resources), which is already provided by default when creating the Spring Boot project, we must add some properties related to the database. These properties are standardized, and it is easy to find on the internet which of them should be configured for different databases. In our case, the configuration is as follows:
spring.jpa.hibernate.ddl-auto=update
spring.datasource.url=jdbc:mysql://localhost:3306/rest
spring.datasource.username=yourUsername
spring.datasource.password=yourPassword
spring.jpa.show-sql=true
spring.jpa.properties.hibernate.dialect = org.hibernate.dialect.MySQL5Dialect

// Just copy and paste it. Remember to write the username and password that // are configured in your machine.
Having taken the first step in our REST API, we now need to write our classes, allocate them in layers according to the desired architecture and, finally, create our first endpoint.
Classes, Layers, and Endpoint
After importing the project that we created through Spring Initializr, we can see that a Java class is automatically created inside the main package of the project. This class is formed by the composition of the project’s name (in our case, “RestApi”) and the word “Application”.
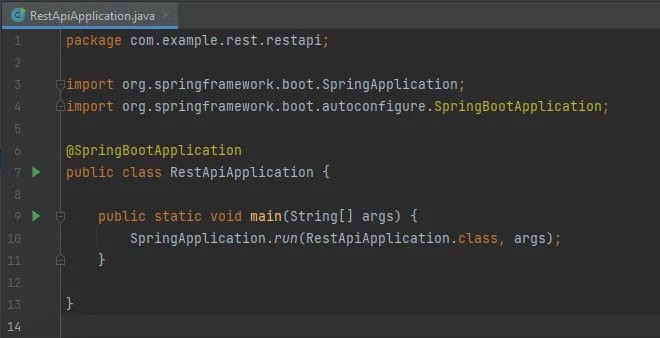
This simple class has a main method, which calls the run method of the SpringApplication class. The application starts when we execute it. As said in Part 1, a Tomcat server is already built in the application, and it is automatically initialized (by default on port 8080).
Once the application goes live and is working properly, we can proceed to the creation of our first endpoint: the registration of users.
But before we start creating our classes, let’s set a new dependency on our project: the Project Lombok library. We just need to paste the code of the dependency on the proper place in pom.xml file and reload Maven. Once we do that, we can use Lombok’s annotations to save us time. We’ll talk about it later.
<dependency>
  <groupId>org.projectlombok</groupId>
  <artifactId>lombok</artifactId>
  <version>1.18.22</version>
  <scope>provided</scope>
</dependency>
To organize the project, a good approach is to distribute the classes into packages that represent layers. In our case, we will choose an architecture that separates our classes into Service, Model, Controller and Repository.
In our model layer, we will have a User class. It will contain the user’s data: name, email, date of birth and CPF (a tax ID that we use everywhere in Brazil).

This class is a JPA entity, which means that it is a class that will represent the tables in the database. That’s why we must add the @Entity annotation above class’s declaration.
In addition, in the id attribute we must use the @Id and the @GeneratedValue(strategy = GenerationType.IDENTITY) annotations, as it is the primary key that will be automatically generated by the database.
Finally, @Table, @Column and @Size annotations are used to specify some characteristics of our class and its attributes – like name, length, etc.
Once we do that and run the application, the table “users” is automatically created in the database with its respective columns.
You may have noticed that we didn’t write getters, setters, equals and hashcode. That’s because we are using Lombok, so those methods are automatically generated. We just need to use the @Data annotation above the class’s declaration. By doing this, we have a much cleaner code, and we make its writing much more dynamic.
The purpose of this endpoint is the registration of users. For that we must use the POST method (in the context of REST and HTTP), so we can register the data in the base. To retrieve data, we must use the GET method. To update and to delete, we use the PUT and DELETE methods, respectively. For now, we will only handle GET and POST.
Creating the Users endpoint
For the User to connect to the server, we need to create a controller. For that, we create the UserController class in the com.example.rest.controller package.
Controller
The controller is used to map the address that, when called, will return registered users (GET), or allow their insertion, updating or removal from our base (POST, PUT, DELETE).

When we look at UserController class, we can see that it has several annotations. These annotations belong to Spring Web (a dependency that we added when we created the project).
Above UserController we see the annotations @RestController and @RequestMapping(“/users”).
The first one is used to indicate to Spring that the class is a controller that must be managed according to REST. This means that the use of the annotation @ResponseBody is already implied by default, that is, Spring gives us back the method return itself (in JSON), not expecting the navigation to a page (JSP, for example).
The second annotation just tells Spring to where the class is mapped.
Service
We can also see the userService attribute annotated with @Autowired. In this architecture that we are using, the service is the layer that will contain all our logic.
Our service will have the logic of CRUD methods and some methods to perform conversions to and of DTOs (we will come to it later).

Here we use the @Service annotation to tell Spring that this class is a service. We also need to inject, through the @Autowired annotation, a userRepository.
Repository
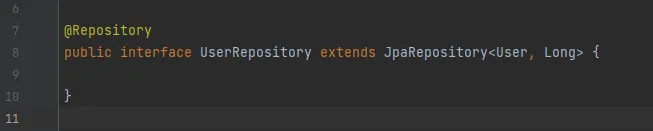
The repository is an interface that inherits several ready-made methods, abstracted from another interface. This saves us the work of creating a bunch of methods for the CRUD operations that we will use in our project.
For that, in the com.example.rest.repository package, we must create the UserRepository interface, which inherits the JpaRepository interface, passing as parameters of the Generics the entity with which this interface works, and the type of the attribute’s primary key of this entity. In addition, we use the @Repository annotation to tell Spring that this interface is a repository.
And that’s all. When we declare a userRepository in our Service, practically all the methods we need are ready to be used.
Now let’s go back to the Controller and check the GET and POST methods.
GET method
The list and findById methods have the @GetMapping annotation, which indicates that these are the methods that will be called when we use GET on addresses mapped to “/users” and “users/{id}”, respectively. We can also observe that the methods, using the service, return objects of type UserDto. The @PathVariable annotation in the method that finds a user by id is used to tell Spring that its parameter is the same as the one passed in @GetMapping.

DTO
But what is this UserDto? Well, it is known that it is not the best practice to return JPA entities (classes connected to the database) in the controller. Since our User class is one of these entities, it can contain sensitive and private data that must be kept away from the direct connection to the controller. Also, if we returned a User instead of a UserDto, all attributes of the User class would be serialized and returned in JSON, and we wouldn’t be able to choose the desired attributes — that is, we would lose flexibility.
That’s why we should create a DTO (Data Transfer Object), a class that represents only the data that we want to return to this endpoint. In our case, we will create the class inside the com.example.rest.model.dto package.

The class will have the attributes shown above, a default constructor and a constructor that receives as a parameter an object of type User, which already contains all the required information (id, name, email, CPF and date of birth). Since we are using Lombok, we can also annotate the class with @Data, which will save us from creating all the getters and setters.
The @JsonFormat annotation above the date is used to specify the pattern by which we will receive the JSON in the request.
To properly return UserDto objects in the Controller’s methods, we need to use the userService that was injected, since in the UserService class we also injected the userRepository, which already has its ready-made methods. In our case, the suitable methods are findAll, to obtain the list of all users, and findById, to obtain a specific user. After its use, we just need to do the conversion with the convertListToDto and convertToDto methods.

POST method
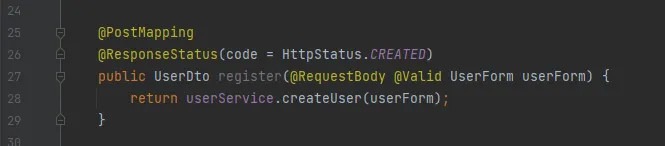
Another method in the UserController class is the register, which receives the @PostMapping annotation and returns a UserDto.
Similar to @GetMapping, @PostMapping tells Spring that the method that will be called when we use POST in a request mapped to “/users” will be the register.
We can see that the register method receives a parameter of type UserForm. The UserForm class is also a DTO. However, since we’re dealing with a POST, the data goes from the client to the API (not the other way around), so we use the Form naming pattern. Then we have the UserForm class in the com.example.rest.model.form package.
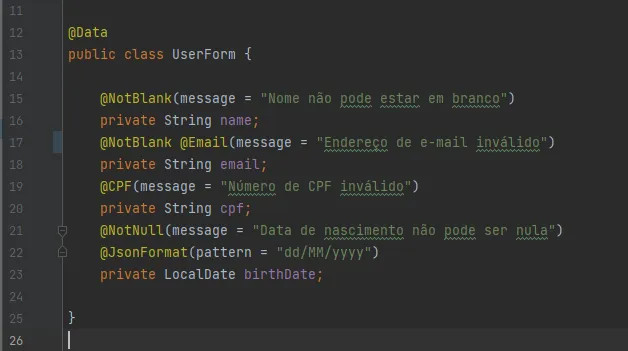
Form
Like the UserDto class, the UserForm class contains User attributes and the @Data annotation from Lombok. Also, we can see annotations above the attributes. @JsonFormat, as we saw in UserDto, is used to specify the pattern for the passing of parameters in JSON. The other annotations are part of Bean Validation, which we added as a dependency on the project creation, through Validation.
Bean Validation
Bean Validation is a Java specification that integrates with Spring. It allows our validations to be done through annotations, which saves us a lot of time and work. It means that we don’t need to write code for every validation, with “ifs and elses” scattered throughout our classes.
So, if we want to confirm that the attribute sent via POST is not null, we just use @NotNull. For empty attributes, we use @NotBlank. And we still have more specific annotations, such as @CPF and @Email, which verify the validity of the data that were passed. There are many other annotations that can be utilized.
Back to the Controller
Continuing with the UserController’s register method, we see that in front of the userForm parameter there are the annotations @RequestBody and @Valid. The latter is necessary for the Bean Validation to work. The first is necessary to tell Spring that, since it is a POST, the parameters must be obtained in the body of the request (and not in the URL, as in the GET method).
Thus, when we make a POST request, we are able to create a User object, which we can then write to the database through the createUser method (from the Service), which uses the save method (from the Repository). Like we see in GET requests, we have a transition between layers until we reach the Repository and its ready-made methods.
Another thing we can see in the register method is the @ResponseStatus annotation. It is used to specify the type of return that we will get when making a request via POST. If we don’t define anything, the return we will get will be the code 200, which just means “OK” (in the case of success, of course). If the request works correctly, using this annotation and the parameter that was passed, we will then get the code 201 (“Created”), which means that something was created successfully.
With it, we already have our classes, and the endpoint is almost ready to be tested. But, before that, we will see how our database will look when we run this application.
Database and Error Handling
Now, we will see what our database looks like after we run the program for the first time. Then we will simplify the JSON we get as a response when an error occurs.
MySQL
Since we are using Hibernate, our tables and their respective columns are created automatically when we run the application.
As we can see, Spring makes things easier for us to the point where we do not have to deal with SQL directly. With the annotations that we wrote in our classes, we have the following result:

In the way we built the application, the id is the primary key (which is auto incremented), and CPF and email are unique keys. Thus if we try to register a user with an email or a CPF that already exists in the database, an error will occur.
Simplifying JSON
The next step is to simplify the JSON that Spring sends as a response in the case of errors. By default, we receive an extensive, barely readable JSON. To ameliorate how the response is presented, we can make the use of an “interceptor”.
We do this by creating an isolated class whose function will be to handle errors. This handling, as it is outside the controller we are working on, will take care of errors of all controllers existing in our application.
We must create then the ErrorHandler class in the com.example.rest.config.validation package.

The class is annotated with @RestControllerAdvice, which is used to perform error handling in REST. The only method of the class is handle, which has a MethodArgumentNotValidException as a parameter and returns a List<ErrorFormDto>.
This returned list is an ErrorFormDto, whose function is to represent the form error. Like any DTO, the class has the attributes, the constructor initializing those attributes, and the @Data annotation (remember Lombok?). The class is also in the validation package.
We will establish that the attributes that will be returned in JSON when there is an exception are just the field in which the error occurred and the error message.

Let’s go back to the handle method. To get the errors that occurred in the request, we call the getBindingResult and getFieldErrors methods on the exception that was passed as a parameter, and then we assign it to an error list variable.
This list contains the errors we are looking for. However, since the method returns a list of ErrorFormDto, we must create a DTO variable and initialize an ArrayList, in which we will add the errors that were found. Iterating through the fieldErrors list, for each element found we create an ErrorFormDto object and save it in our ArrayList.
Inside a forEach, to create an ErrorFormDto object, we must provide the field and errorMessage parameters. For the first one, just use the getField method. For the second, we need to create a String that receives a MessageSource that was injected into the class (@Autowired). This is a Spring class that helps us get error messages, including locale-dependent ones, through LocaleContextHolder.getLocale.
Furthermore, to tell Spring that the method will be used when there is an exception within a controller, we use the @ExceptionHandler annotation, passing as a parameter the type of exception that occurs in the validation of forms: MethodArgumentNotValidException.class.
To ensure that we get the status 400 when there is an exception, we must use the @ResponseStatus annotation, passing HttpStatus.BAD_REQUEST as a parameter.
This is how we get a simplified JSON when an exception occurs.
In our REST API we still need to implement the methods for updating (PUT) and removing (DELETE) users, and then perform the request tests via Postman.
PUT and DELETE methods
To complete our CRUD methods, in this part we are going to implement the “U” (Update) and the “D” (Delete).
Like we did with Create and Read methods, the implementation here is also quite simple. Since we have already explained what a DTO is and how the data transfer between the layers (controller, service and repository) happens, here we will focus on the creation of methods in Service and how they will be called in Controller.
PUT method
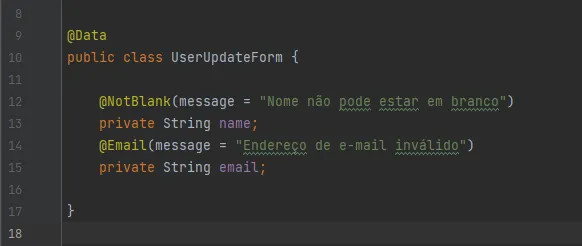
In the UserService class, let’s name our update method updateById, which will return a UserDto. It takes as parameters an UserUpdateForm and the id (of type Long). We need a new DTO, specific for the update, because our application will allow the user to modify only his name and email, but not his CPF or his date of birth.

So, we create the UserUpdateForm class with only the necessary attributes and the Lombok and Validation annotations.
Returning to the service class, we see that the first thing the updateById method does is to perform some validations and set the new values to the attributes that will be changed. Then, with the same save method from the Repository — which we already used in the createUser method — we save the data in the base and return the updated UserDto.

Finally, in the Controller class, we just need to use the @PutMapping annotation above the method and pass the path as a parameter. This method, also called updateById, receives the same parameters that we saw in Service, but now with @RequestBody and @PathVariable annotations. Then we just need to return the UserDto that was created, using the userService.
DELETE method
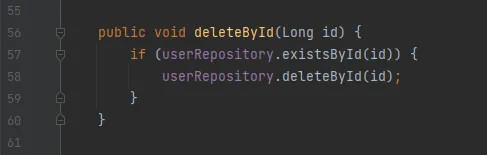
Removing a user is quite simple. Since we will not be inserting information into the database, we do not need to create a new DTO. To delete a user based on their id, we just use the existsById method and then remove the object that has that id with the deleteById method. Both methods come ready-made from the Repository.
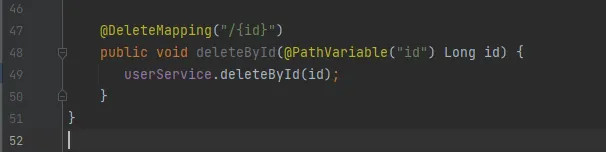
Once that’s done, we just need to create our deleteById method from the Service in our Controller and pass the id as a parameter. We must not forget about the @DeleteMapping annotation with the path and @PathVariable annotation in the parameter.
And we are done. After making these small adjustments, we now have completed our CRUD. We can create a new user in the database, we can retrieve the data and read the information, we can update the data, and at last, we can remove users based on their id.
Of course, it would be possible to make many improvements to the code, make it cleaner and so on. But for our purposes here, this is already sufficient.
Testing with Postman
Now, we will finally test the methods we created and see how our API works.
If we had created an application that only had GET methods, it would be possible to test it directly through the browser address bar. However, since our API deals with registrations and updates, that is, the POST and PUT methods, it is necessary to use another technology to help us in the tests. And that’s what Postman is for.
First, we will test our user registration. For this, in Postman we must select the POST method, enter the application address (http://localhost:8080/users) and select Body → raw → JSON. Once this is done, we just need to write in JSON, in the body of the request, the attributes and values that we want to register.
With the application running, we trigger the request by clicking on “Send” and we get the following result:
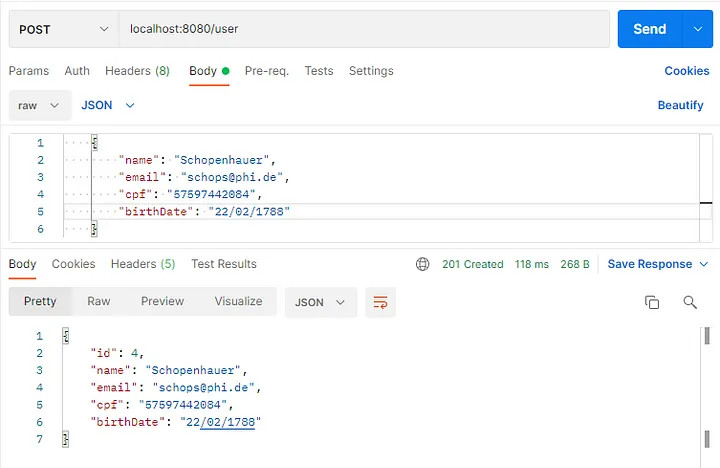
As we can see, we get code 201 as a response, which means that data were created successfully. In the body of the response, we have exactly what we expected in JSON, including the creation of an id (it’s 4 because I had already registered users before).
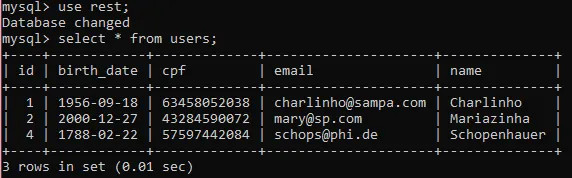
Then, if we do a select on the database, we can see that the registration was added successfully.
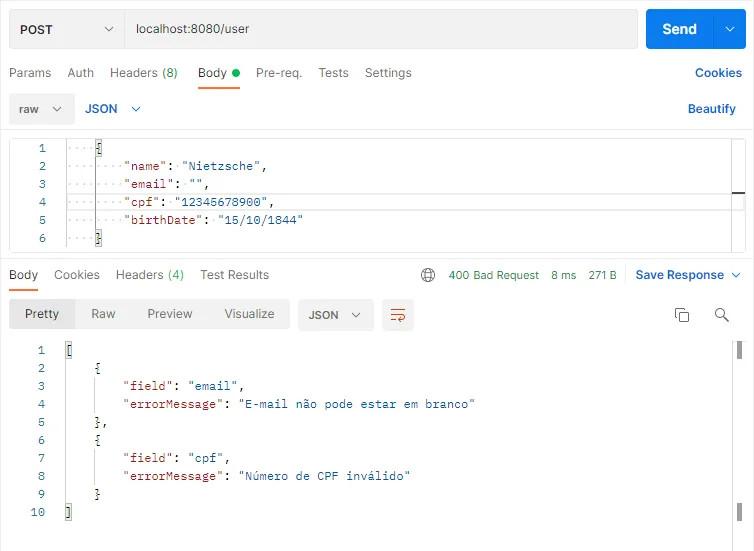
You probably remember that in UserForm we used some Bean Validation annotations, such as @NotNull and @CPF. Let’s test those validations. When we make a request with an empty email field and with a CPF that does not exist, we get the code 400 and its respective error messages as a response.
A very interesting feature that we can use in the request header is the Accept-Language. As we defined in the ErrorHandler class, the error that is returned in response may depend on where we are (or, in this case, the location/language we selected). In the example below, we selected the German language, and the error message was returned, as expected, in German.
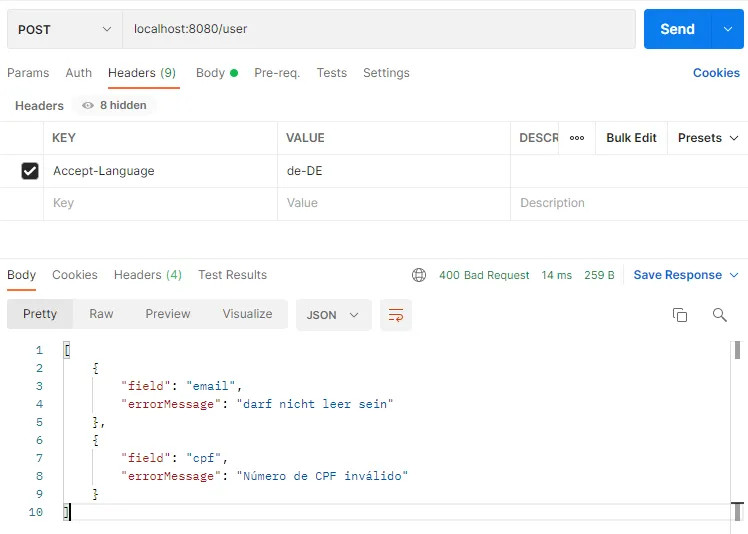
The CPF message is in Portuguese because we defined this specific message in the annotation of our Form DTO class. The language customization of the response will only happen if no message is defined in the annotation.
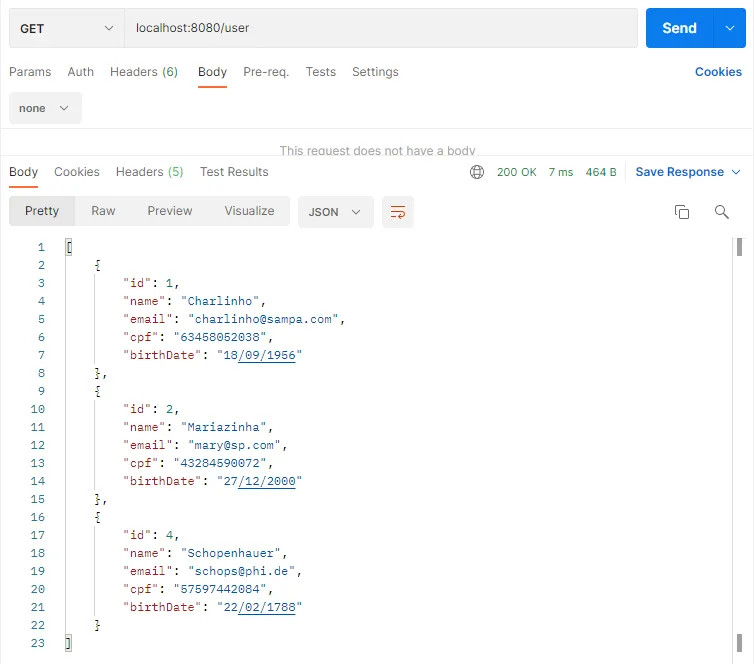
With the GET method selected, we can get the entire list of registered users:
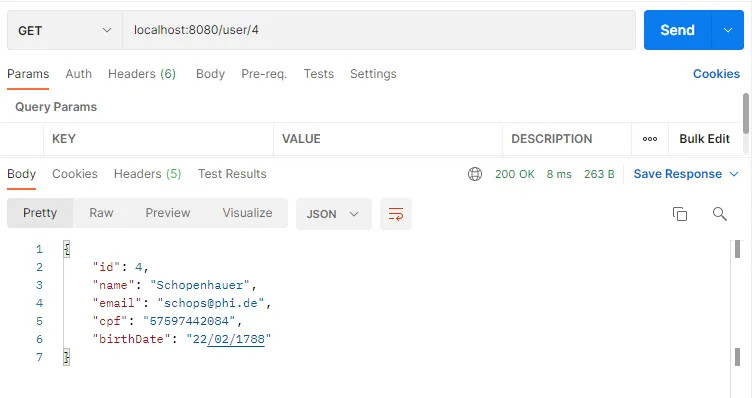
If we pass an id as a parameter in the request, we only get the user whose id was specified:
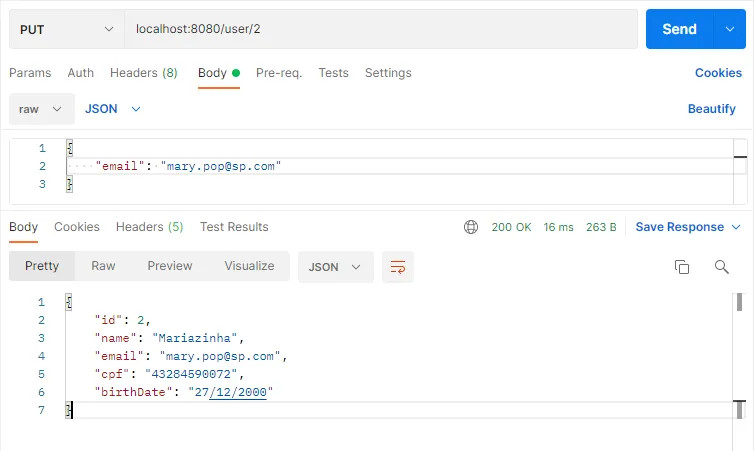
If we want to change some data from a user, we use the PUT method and pass an id as a parameter. In the body of the request, we specify which attribute and which value we want to change.
And if we try to change the CPF or date of birth fields, we see that they cannot be modified, because they were not in the list of attributes that were set in the UserUpdateForm class:

Finally, we have the DELETE method. To use it, we just select it and pass the id of the user we want to remove.

We got the code 200 (OK) as a response, so it means it worked. When we GET the entire list of users again, we see that Charlinho, who had id 1, was successfully removed.

Since we established CPF and email as unique keys, we cannot register duplicated data from these attributes. When we try to register a user with a CPF, for example, that already exists in the base we get the following result:
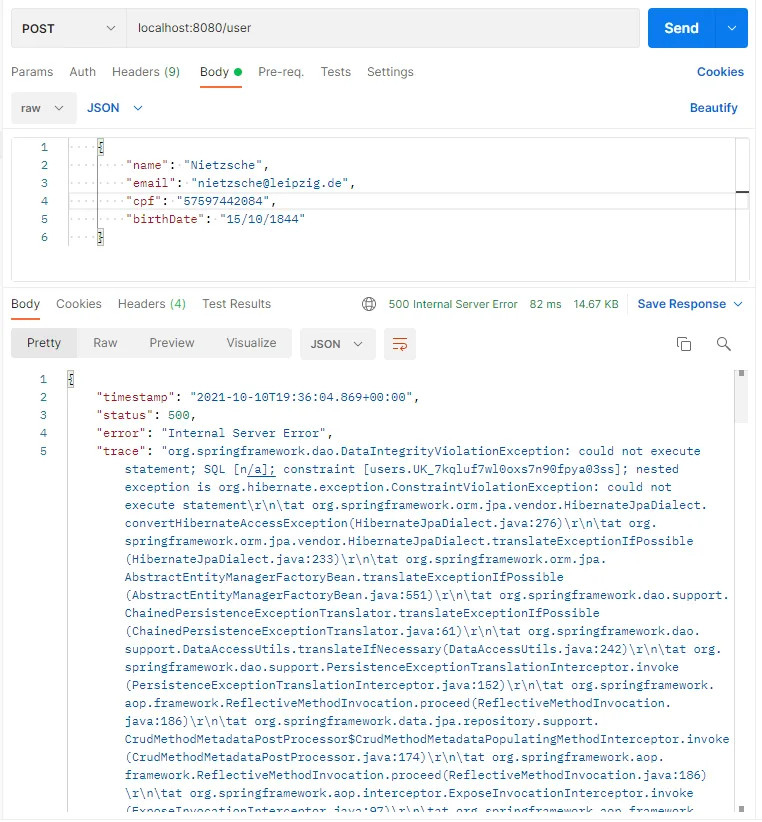
The code that we get in return is the 500 (Internal Server Error) because it is a server-side error. That’s why we didn’t get a more refined message, like the ones we had when the error occurred on the client side (code 400, for example).
And just like that we finally finished the tests of all our CRUD methods in Postman. We’ve seen the successes and errors, and everything is working fine.
A next step to continue to build our REST API would be to create new entities so that we could establish relationships between them (one-to-one, one-to-many, many-to-one and many-to-many). But for our purposes here, we did well enough.